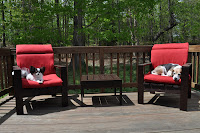
The chairs I decided to build were the “SimpleOutdoor Lounge Chairs” from Ana-White.com site mostly because it had the word simple in it…lol.
|
Schedule of my week of building
- Day 1: Cut wood for two chairs and table
- Day 2: Sand and Stain all wood*Stained front and all sides in the AM, wait 8 hours to dry, then stained back in the PM
- Day 3: Building Day (Table)/ Touchup paint/ let dryIn total, I spend about 3-4 hours to build it since I had a bit of a learning curve. If I were to do it again it would probably take me 2.5- 3 hours to build
- Day 4: Add sealant (24 drying time)/ Build 1 chair/Touch up Chair/let dry The chairs took about 4-5 hours each to build
- Day 5: Add sealant to chair #1/Build the other chair/touch up/ let dry
- Day 6: Add sealant to chair #2
- Day 7: Enjoy my new furniture!
You maybe wondering why I didn't start building my chairs until day 4. Well, to be honest, I was TIRED ..lol I was actually pretty sore from all the painting and sanding so I took the rest of day 3 to do some much needed yard work.
Since the wood was going to be used outdoors I decided to buy Weather shield wood since they will be outside in the elements, but since I did use a deck sealant I’m not sure it really made a difference.
This table is SUPER cheap to make! If I had used another type of lumber it would have been cheaper, but of well. The lumber for these two chairs including the military discount was less than $55!! Just remember, I did have screws, wood glue, wood filler, sandpaper, stain, and sealant on hand so if you do not already have those, expect your price to be higher.
Unlike the plans for the table, the chair plans did not come with cutting instructions to help conserve board. To help with this, I enlisted the help of our best friend who is a math whiz.
For the chair she also recommends you cut, sand, and then stain before you begin to build. I cannot agree with her more! Putting on that first coat of stain helps because if you wait until after, you will have plenty of trouble getting into all the nooks and crannies later.
Once everything was done I went to Garden Ridge and bought two cushions for my chairs which have been enjoyed by my boys every time they have gone out on the patio!
--Mickey
Once everything was done I went to Garden Ridge and bought two cushions for my chairs which have been enjoyed by my boys every time they have gone out on the patio!
--Mickey
MATERIALS AND TOOLS
Shopping List
|
Tools
|
Cut List
4 – 1×4 @ 22 1/2″ (Legs)
2 – 1×4 @ 27″ (Arm Rests)
1 – 1×2 @ 27 1/2″ (Back Tie In, for a stronger chair, you could use a 1×4 here)
3- 1×4 @ 22″ (Seat Frame Supports)
2 – 1×4 @ 24 3/4″ (Seat Frame Sides)
2- 1×4 @ 20 1/2″ (Front and Back Seat Aprons)
2 – 1×2 @ 24 3/4″ (Seat Side Trim Pieces)
5 – 1×4 @ 20″ (Seat Boards)
2- 1×2 @ 19 1/2″ (Seat Back Back Supports)
1 – 2×2 @ 22″ (Seat Back Bottom Support)
5 – 1×4 @ 21 1/2″ (Seat Back Boards)
VISIT/FOLLOW MICKEY ON THE BELOW SITES


2 – 1×4 @ 27″ (Arm Rests)
1 – 1×2 @ 27 1/2″ (Back Tie In, for a stronger chair, you could use a 1×4 here)
3- 1×4 @ 22″ (Seat Frame Supports)
2 – 1×4 @ 24 3/4″ (Seat Frame Sides)
2- 1×4 @ 20 1/2″ (Front and Back Seat Aprons)
2 – 1×2 @ 24 3/4″ (Seat Side Trim Pieces)
5 – 1×4 @ 20″ (Seat Boards)
2- 1×2 @ 19 1/2″ (Seat Back Back Supports)
1 – 2×2 @ 22″ (Seat Back Bottom Support)
5 – 1×4 @ 21 1/2″ (Seat Back Boards)
- Building with Army Wife Mickey Chair Edition
- TTC - How Mickey Handles the 2WW
- 27 Months of TTCing - Mickey
- TTC - RE Appointment Update, Metformin, & Feeling Weird - Mickey Vlog
- TTC - Feeling Better/Keeping Busy - Mickey Vlog
- TTC - Ripping Off the Band Aid / Cycle Results - Mickey Vlog
- Introducing Mickey
VISIT/FOLLOW MICKEY ON THE BELOW SITES


WE"RE ON THE FENCE! CLICK BELOW AND VOTE FOR US!
REMEMBER YOU CAN VOTE ONCE A DAY!
REMEMBER YOU CAN VOTE ONCE A DAY!


No comments:
Post a Comment